Previous: Your song library | Next: Song Tags | User Manual home
Managing songs
The number of songs you can store in SongSheet is limited only by the capacity of your iPad.
Add a new song
Tap  (the compose button) to add a new song. SongSheet will create a new untitled song and open the lyrics view in edit mode. (See the chapter on editing songs for more information.)
You can now write your own song, or copy and paste the song lyrics and chords from the web or another source. There are literally thousands of song sheets available online on various websites. Simply search for “<song-name> lyrics and chords” in a search engine and more often than not you can find what you are after. Copy the text, switch to SongSheet, create a new song, then paste the contents of the clipboard into the song you create. On iOS 11 and above you can just drag the selected text from Safari into SongSheet to add it to your song.
Now you are free to edit it to get it just the way you need it. You can do the same thing with PDF files or any other document in which you can select and copy text.
Import a song
SongSheet supports importing files from other SongSheet users, plain text, various ChordPro formats (including .dbt files from Song Sheet for Windows), Microsoft Word (.doc, .docx), PDF, and RTF formats.
You can either import via the built-in document picker (which will vary based on what version of iOS you are running SongSheet on; see below), or via iTunes File Sharing. You can also drag and drop from Files into your SongSheet library.
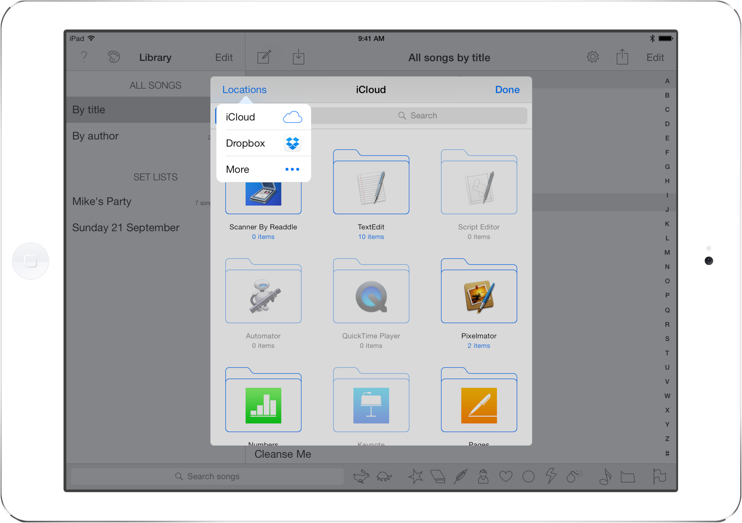
Tap  (the import button) to display the various import location options. What you see here will depend on a few things:
- If you have copied any files into SongSheet’s file sharing area (via iTunes running on a Mac or PC), then you will see the “Import from iTunes” option.
- On iOS 9 or 10, you will see entries for each cloud storage provider you have available on your iPad. For example, iCloud Drive, Dropbox, etc.
- On iOS 11 and later, you will see the Browse option, which will launch the built-in Files-based document browser.
For example, on iOS 9 or 10, if you select to import from iCloud Drive, you will see the following:
Not all files in the browser are selectable; they must be one of SongSheet’s supported import formats. You can select files in SongSheet (.songsheet-song) plain text (.txt), PDF (.pdf), RTF (.rtf), ChordPro (.chordpro, chopro, .cho, crd), DSBsoft’s Song Sheet (.dbt), and OnSong (.onsong) formats. Other files, e.g. Word or Pages documents, cannot be imported by SongSheet and so they will be greyed out and unselectable.
Once you have selected a file to import, you will then be presented with the import preview.
A plain text song needs to be parsed to determine the various line types. SongSheet does its best to automatically determine if a line is chords, lyrics, the song title, etc, but it isn’t perfect. So you have the opportunity to override what SongSheet has detected in the import preview:
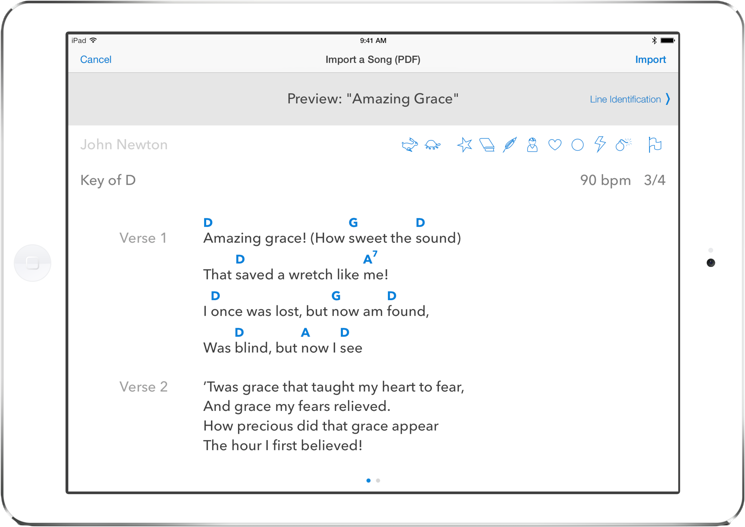
You can see here how SongSheet has recognized the various parts of the song from the input file. You can also type in a new artist, or specify one or more tags which can be used to easily find the song later (see the next section on image tags for more information).
Tapping the Import button in the top-right will add the song to your library. Alternatively, you can tap Cancel in the top-left of the screen to dismiss the import view without importing the song.
SongSheet tries to identify the type of each line in the song, but sometimes it gets it wrong. For example, a chord line or a stanza name might be misidentified as lyrics. In this case, you can easily fix this. Tap on Line Identification or swipe the song to the left. You will then be presented with a new view where you can override the line types that SongSheet detected:
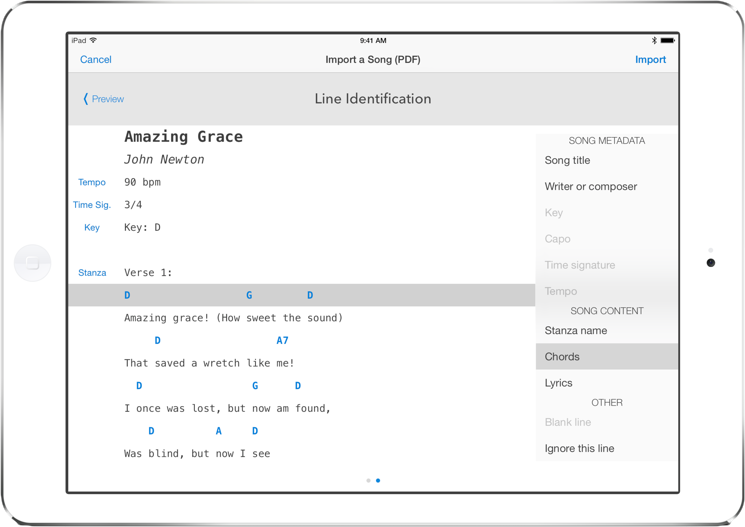
In this case illustrated above, all the lines are identified correctly. But if they weren’t, all you’d need to do is tap on the wrongly-identified line, then select the appropriate line type from the list on the right. You can also force SongSheet to ignore (not import) a line by selecting Ignore this line from the list.
Open a song from within another application
Another way of getting songs into SongSheet is by using the “Open in…” option from another application. You can do this with any file format that SongSheet supports. Select SongSheet from the list of applications that appears. Once SongSheet opens, it will present the same import preview screen as described in the section above.
Drag and drop songs on iOS 11+
Using the new Files app, it is quite easy to just drag and drop the songs you wish to add to SongSheet Pro. You can either drag in a whole folder full of songs, or do so one at a time.
This works also if the song file is an attachment to an email, or in another application. If it is one of SongSheet’s supported formats, and you can drag it, then you can also drop it into SongSheet’s library.
The video below demonstrates how to import songs and folders into SongSheet Pro via drag and drop:
Drag and drop text to create a song on iOS 11+
Using drag and drop, adding songs to SongSheet Pro from websites is much easier than on older versions of iOS. All you need to do is open Safari, find the lyrics and chords for the song you are after, then select the song and drag it into SongSheet.
This video demonstrates how easy this can be:
Delete a song
To delete a song from your library you must be viewing your song library (by title or artist) and not a set list. (If you are viewing a set list, you will only remove a reference to the song from that set list rather than deleting it from your library.)
There are two ways to delete a song from your library:
- Use the standard swipe right-to-left gesture on the song entry; a red Delete button will be shown. Tap the button to permanently delete the song, or tap elsewhere to cancel.
- Tap the Edit button at the top right of the screen. You will see a red delete icon appear on the left of each song title. Tapping this will present the same red Delete button mentioned above. When you have finished deleting songs, tap the Done button.
Warning: once a song has been deleted you can’t get it back.
Make sure you make regular backups of your song library to provide a means of recovering songs you may have accidentally deleted. Backing up is easy and explained in a later section.
Previous: Your song library | Next: Song Tags | User Manual home